
There are plenty of good reasons why you might want to change your email account. You want or need to change email providers, you hate your current email address, or you’ve become inundated with spam.
However, switching email accounts can feel like a daunting task. Not only do you need to notify everybody of your new email address (including all of those sites where you’ve created accounts over the years), but there’s also the fear that you’ll miss an important email from a person or organization that you can’t afford to miss. (If you need help setting up a new email address, read my tips on How to Change Your Email Address.)
Fortunately, it’s fairly easy to make the change and not lose any emails in the process. I successfully transitioned my parents and mother-in-law to Gmail addresses, so it’s easier than you may think. Here’s how to do it.
1. Try to keep your old email address as long as possible
When switching accounts, you’ll want to hold onto your account for a little while to ensure the process has worked smoothly. If you’re switching jobs or leaving school, find out how long you’ll have access to your old email address before it’s deactivated and plan accordingly. Most organizations won’t let you access your account, but some may forward email for a length of time to your new account.
2. Create a new email address
Create an email address with a free provider like Gmail or Outlook.com. Do not use the email assigned by your internet service provider, company or school. When choosing your new email address, use your name or something that will age well over time. If you have a common name, try using your last name first or a combination of your initials and your last or first name.
3. Forward emails to your new email account
You can forward your messages while retaining a copy with your old mail service. Or, you can forward your messages and delete the copies on your old mail service.
Forward emails to Gmail
- Go to Gmail and select the cog icon in the upper right corner and select “Settings.”
- Select “See all settings,” “Accounts and Import” and then “Add a mail account.”
- Enter your email address and leave the box “Treat as an alias” checked so when you reply to email it will come from your new Gmail account. Keep the option to “Send through Gmail” selected. You’ll then need to “Send Verification” to show that you own your old email account.
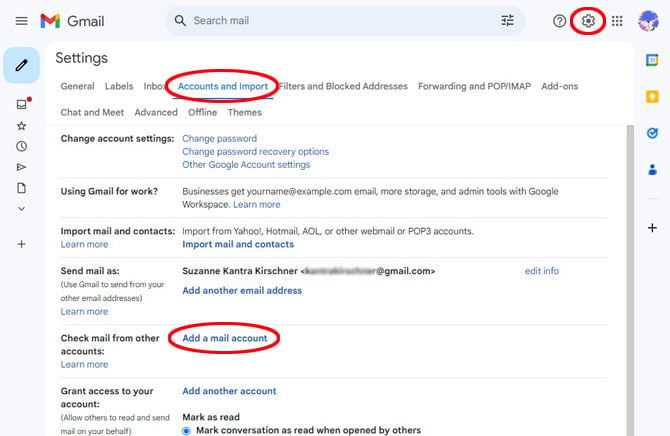
- For most email services, all of the fields will be pre-populated, if not, you can get the information from your email service provider. Then select Add Account.
- Once you have connected your account, go back to Settings > Accounts and Import> and choose to “Always reply from the default address,” which should be your new Gmail address.
Forward emails to Outlook.com
Unless your old email is a Gmail account and you subscribe to Microsoft 365 ($69.99 per year), you can add you can’t set up Outlook.com to pull in your old email. If you are a Microsoft 365 subscriber, you can add your Gmail account to Outlook.com.
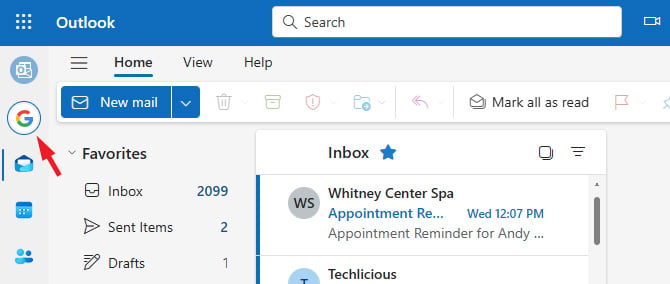
- Go to Outlook.com and select Settings (cog in the upper right corner).
- Select “Premium” and in the “Additional mailboxes” section, click on “Add account.” Sign into your Gmail account and it will sync with Outlook.com. You can only add one additional mailbox.
Note that your Gmail email will remain in a Gmail tab and you can’t set a default “From” address.
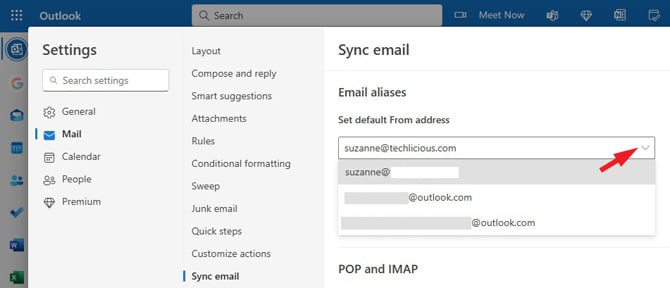
If you have more than one Outlook.com account, can choose the option to “Set default From address.”
- Go to Outlook.com and select the settings cog in the upper right corner.
- Select “Mail” and in the “Sync email” section choose an email address from the pulldown menu under “Set default From address.”
Forward emails to Outlook
- Open Outlook and select File from the top menu bar.
- Select “Add Account” and then input your old email address. Depending on your old email provider, you may have to enter your email settings manually.
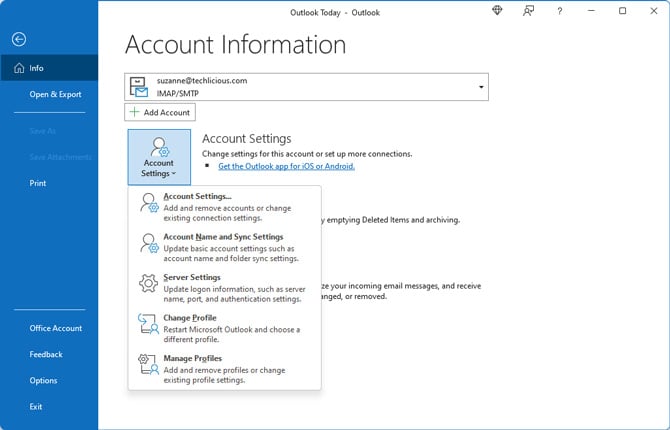
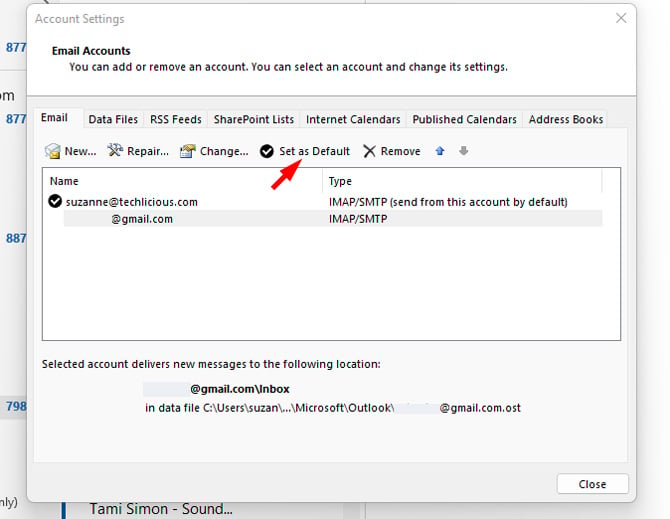
As you move to your new account, you’ll also want to change your default email address.
- Go to File > Account Settings > Account Settings.
- In the email tab, select the email address you want to use as your default address and then click on “Set as Default.”
Forward emails to New Outlook
- Open New Outlook app and select Settings (cog in the upper right corner).
- Select Accounts from the left navigation bar and then “Add account.” Follow the prompts to add your account. New Outlook works with Microsoft 365 accounts, Gmail, Yahoo, iCloud, IMAP, and POP
As you move to your new account, you’ll also want to change your default email address.
- Open New Outlook app and select Settings (cog in the upper right corner).
- Select “Mail” from the left navigation bar and then “Sync email.”
- You’ll see “Email aliases.” There you can choose your default “From” address. You can only choose an Outlook account or Outlook email alias.
4. Import your contacts from your old email address
Chances are that you have an address book associated with your old email account and you’ll want to import them for use with your new account. Before importing contacts, you’ll need to export your contacts from your current provider to a CSV file or, for Google Contacts, a CSV or vCard file. Search for “export contacts from (name of your old email provider)” for instructions.
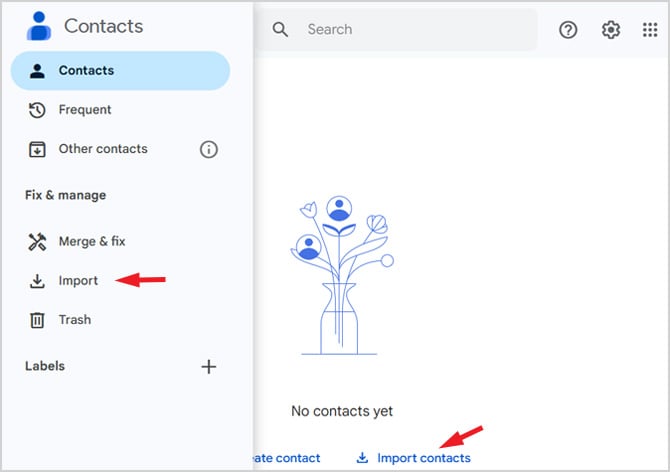
Importing to Google Contacts
- Go to Google Contacts.
- Select “Import.”
- Upload your *.csv or *.vcf file.
Importing to Outlook.com
If your old email is a Gmail account and you’ve added it to Outlook.com, your contacts will appear in the Gmail tab. You can also import them into your Outlook.com email account.
- Select the People icon.
- Select “Manage contacts” from the ribbon menu.
- Choose “Import Contacts.”

Importing to Outlook
- Go to File > Open & Export > Import/Export.
- Select “Import for another program or file” and then click on “Next.”
- Choose “Comma Separated Values” and click on “Next.”
- Select your CSV file and choose from import options – “Replace duplicates with items imported,” “Allow duplicates to be created,” or “Do not import duplicate items.”
Once imported, you’ll find all of your contacts under the contacts icon in the lower left corner.
Importing to New Outlook
- Select the People icon.
- Select “Manage contacts” from the ribbon menu.
- Choose “Import Contacts.”
- Select your CSV file and select “Import.”
5. Tell people about your new email address
Once you have your new email up and running, it’s time to email everyone telling them about your new email address. Be sure to use the Bcc option (blind copy) in the address bar, so you don’t accidentally share other people’s email addresses with the whole group.
You may also want to add a signature that calls out the fact that your email has changed.
- For Gmail for to Settings > See all settings > General and scroll all the way down to Signature.
- For Outlook.com and New Outlook, go to Settings > Mail > Compose and reply.
- For Outlook, go to File > Options (at the bottom of the left nav) > Mail > Signatures to create or modify and existing signature.
Updated on 6/28/2024 with instructions for New Outlook and new screenshots
[Image credit: Google account creation screen on laptop via SmartMockups, screenshots via Techlicious/Google/Microsoft]
For the past 20+ years, Techlicious founder Suzanne Kantra has been exploring and writing about the world’s most exciting and important science and technology issues. Prior to Techlicious, Suzanne was the Technology Editor for Martha Stewart Living Omnimedia and the Senior Technology Editor for Popular Science. Suzanne has been featured on CNN, CBS, and NBC.


